With Excel, your formulas, charts, and reports are only as good as the data you enter. So, if you’re responsible for entering a vast data set, it’s important to minimize the risk for error.
If you don’t, the repercussions could prove disastrous (for evidence, see our earlier article).
We have already covered one key strategy for avoiding data input errors: use an Excel form. Excel also comes with other options to help streamline the chore of data entry while also helping to ensure accuracy.
1. Use data validation
It’s easy enough to type a value into the wrong column, or to miss or misplace a decimal point. If you know how to use Excel’s Data Validation tool, you can at least ensure that each value you enter matches the general parameters for its cell.
To enable Data Validation for a selected range, click the Data tab and the select “Data Validation” from the drop-down Data Tools menu. This opens the Data Validation dialogue.
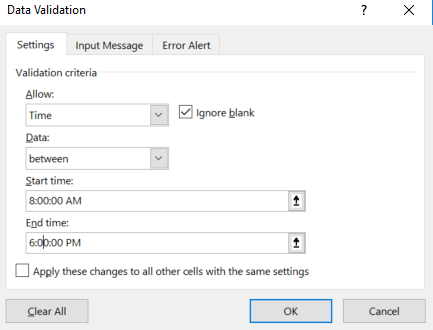
With “Allow” drop-down, you can set the general data type (date, time, number, text, etc.). You can then use the remaining fields to define other characteristics. In this example, we’ve specified that each value entered must be a time between 8:00 a.m. and 6:00 p.m.
You can use the other tabs in the Data Validation dialogue to define an input message (displayed when you select that cell) or an error alert (displayed if the data you enter fails to match your parameters).
2. Create drop-down lists
If you have a finite list of possible values for a field, you can use the Data Validation dialogue to create a drop-down menu in Excel. Choose “List” as your option under the “Allow” drop-down. You can then enter a set of possible values, separated by commas, under “Source.”
In the example below, we have created a list containing the four points of a compass. Once you’ve set up your list, you will see a drop-down menu every time you click to enter data in that range.
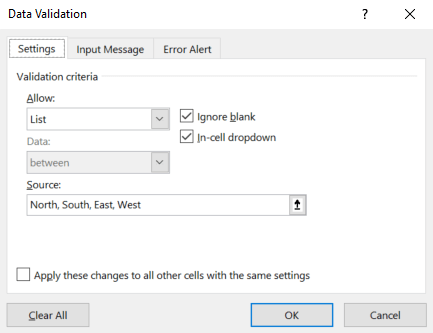
A drop-down menu can speed things up, and will eliminate typos (like “Nort” and “Weast”).
3. Generate a list as you go
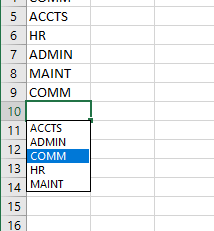
Excel can also supply a drop-down menu while you’re entering text data (this trick will not work for numerical cells). If you press [Alt]+down-arrow (you can also right-click and choose “Pick From Drop-down List”), you’ll see a list containing all the corresponding values from the previous rows.
In the example shown below, Excel allows us to choose from a list of company departments, based on the values entered earlier.
4. Use AutoComplete (and know when NOT to use it)
As you manually enter data, Excel will offer autocorrect suggestions based on your earlier entries. In the example below, when we type “AD,” Excel offers to fill in the “MIN.” Just hit [Enter] and save yourself a couple of keystrokes (these can add up over the course of your day). Using the Show Formulas in Excel feature can help you quickly spot errors by displaying the formulas instead of their results.

As handy as AutoComplete can be, it can also prove distracting—especially if you’re entering values that resemble each other but don’t precisely match up. It can be tempting to hit [Enter] when the opportunity presents itself.
Alternatively, using Paste Special in Excel allows you to control exactly how data is pasted, helping to prevent unwanted errors from AutoComplete suggestions. With advanced paste options, you can paste values, formats, or formulas while avoiding unnecessary overwrites.
If the app is consistently offering you wrong guesses, you should know how to disable Autocorrect in Excel. Click the File tab, choose Options, and click Advanced in the left sidebar. Uncheck the box beside “Enable AutoComplete for cell values.”
5. Color-code your columns
A wide, monochrome spreadsheet can turn your data-entry brain to mush. To help keep yourself oriented, consider giving each column its own distinct fill color. To color-code columns in Excel, select each column and either right-click and choose “Format cells…” or click on the fill-color button in your toolbar (it looks like a spilling can of paint).

Or, get Sheetcast
It’s a bit of a recurring theme in our articles: Sheetcast can help you address most of your issues in data collection and data entry. With Sheetcast, you can easily create an Excel web application, complete with the elegant data validation tools offered within Excel. Your users can enter their own data themselves—simultaneously and in real time—using any browser or mobile device. Administrators can set up automatic notifications to help them keep tabs on their growing data set, and to flag them immediately if problems arise.
If you can use Excel, you can build your own web apps, in minutes. Find out how to convert Excel into web application here. Visit the Sheetcast website for demos and information.